Posts

Showing posts with the label Tiny tip

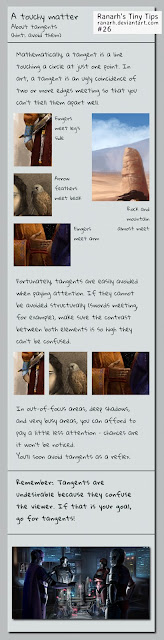
Tiny Tips: Into Darkness

Image
While the title is an obvious quote to the second Star Trek film, the tutorial deals not with spaceships and macguffins, but the issue of shadows in the basic sense. I found them hard to understand in the beginning; I used always the same lighting, never the right colours, and terrible edges. Shadows are the flipside of the lighting scheme of the painting and must be treated carefully. Mostly, they are more saturated than one would think. They are also not objective, but seem "more right" when they are of slightly contemplary colour (e.g. purplish, or cool shadows for warm skin). There's also much more going on in the shadows than one thinks - it's not a flat plane of darker colour. Adding a new lightsource to make sure ths shadows aren't pitch black opens another stage to fill. One more trick I've learned: the terminator (the line where shadows turns into light) looks nicely with a line of more saturated colour blending between the two. This has done wonder...

Tiny Tips mentioned on YouTube

My Tiny Tips tutorial series is sometimes quoted around dA, my main gallery site, but this time one even made it into a youtube video, on Anspire's channel. Check it out here: https://www.youtube.com/watch?v=uZPctrpmoF4&index=4&list=PLAp7GxZk-o_jRe7IMRhVeU8KfIKh0WPi7

Tiny Tips: Patience

Image
My most recent tiny tip, dealing with the patience needed when creating art. I want to reassure all beginning creatives that time trying to finish something is never wasted. Finishing is part of the process and as important as any other; you must be able to draw a line under a project and start another. In time, you will learn when you can or should abandon an idea (for the time being), when it's done, and when it isn't. Most artists are apparently either unable to finish, or finish way too soon. Find the balance! (And while you're at it, learn how many projects you can have going at once.) Allen Williams puts it well by saying, "beginner's drawings are often not so successful because they leave too much white on the page. In other words, there's not enough drawing in their drawing." Considering this, I think, solves a lot of beginner's problems. Work until no spot is left unattended (which of course doesn't mean to cover the page in medium; an e...

Ranarh's Tiny Tips: Tangents

Image
#26 from my Tiny Tips series , to provide absolute beginners with some helpful thoughts what to pay attention to. Tangents - when edges collide and confuse the viewer - are a compositional issue that many seasoned artists avoid without thinking. It's easily solved even in progressed states of the painting, but especially in very busy artworks one should look out for them.

Tutorial: Not Black nor white

Image
A little something about painting black or white objects. Check out my other tutorials on my deviantArt account: http://ranarh.deviantart.com

Colour weight tutorial

Image
I learned about this back in school. It has come in handy for balancing compositions, even if it is far from exhaustive.

Keep an eye out

Image
Bonus information for Tiny Tip #20 Download (ranarh.deviantart.com) My twentieth tutorial from the "Ranarh's tiny tips" series. You can find the other tutorials at my deviant Art account . - The lens sticks out of the eyeball. That's why it so often catches highlights - they do not necessarily appear inside the pupil. When painting mirrored reflections, keep in mind only lit parts are reflected. Reflections can make the pupil appear less than round from afar. - The eyeball is reddish at the inner corner. Some phenotypes have a yellowish eyeball, especially very dark black skinned people. - Eyelashes with heavy black makeup are easier to paint, but I urge you to learn to paint them without first. Lashes are about as long as the eyeball in profile - often men's are longer - and stick out in irregular rows. Don't zoom in too much, that minimizes the risk of too short lashes. Under harsh light, lashes cast a long shadow, especially at the outer corner. ...