Posts

Carte du Melronné

Image
I came up with this while testing the new mapmaking method I recently worked with, and also took it as an opportunity to practise some French. I'm thinking about giving it up for adoption, so maybe someone could invent an actual backstory for it.

Map creation V

Image
My map goes along for a while. Every now and then I add details; I place the capitals (various maps use stars, squares, circles, castles etc to indicate them. I use bordered circles by dotting them with a full-opacity brush and choosing Stroke in the Layer effects menu in Photoshop). I decide I want islands and soon despair because creating them with the lasso is tedious and provides ugly, repetetive results. I resolve the matter as follows (this should have been done much, much earlier, so make sure you do this step as one of the first): In a new file in Photoshop, I choose Render>Clouds, then Render>Difference Clouds several times. Then on a Levels adjustment layer I push the sliders until my "clouds" are only black and white (could also be done with a Posterize layer, set to 2 levels). Ta-dah, these will be my coastline and islands! I cut, paste, transform and rearrange to my heart's content, erasing the water (I still have a file with the water on a separ...

Wild river steps

Image
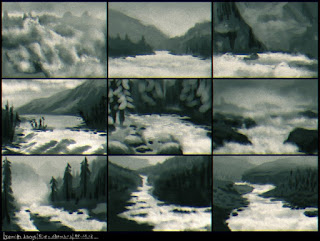
From a recent activity in an online drawing group, the assignment was to paint a downstream river where it becomes wild. 1 - I use basic brushes in Painter for thumbnails, drawing wild water within appealing landscapes. 2 - I expand the lower right sketch and rearrange the landscape with transform tools and overpainting in Photoshop. 3 - Using references for colours I start to paint over in Painter, paying particular attention to the atmospheric perspective. I make heavy use of papers for the textures, especially for the rocks.   4 - I keep refining the depth appearance throughout the picture and add much detail to the foreground, keeping the structures as diverse as I can. I create the village huts and cattle enlarged and shrink them into place. The river is done with basic and custom brushes and textures of coffee stains and clouds. 5 - I start the woods with tree brushes in Photoshop and overpaint them with scraggly brush movements. I add small details li...

Interview on Squidoo

My art recently caught the attention of friendly writer Adrien Scott:, who just did an interview with me for Squidoo. We talk about inspiration, motivation, and advice with a feature of some of my artworks. You can read it here: http://www.squidoo.com/art-features-jennifer-s-lange

Brush and Nebulae packages

Image
I created these two resource packages, "11 patterned pen brushes for Corel Painter", and "5 stellar nebulae backgrounds". You can download them on my deviantArt account ranarh.deviantart.com , both are licensed under the Creative Commons Attribution-Noncommercial License, so you can use them anywhere you don't make money with. Have fun with them!

Patterns, papers, and brushes in Painter

Image
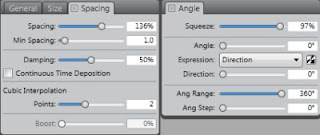
To make certain that a pattern has correct perspective, you will have to paint it by hand. But here are some techniques to make your life easier if perspective doesn't matter so much. Using Brushes as patterns I arrange the brush settings like this: I then use the Pinch and Bulge brushes from F-X carefully to match the perspective. Advantages: by adjusting the spacing or colours (or Color Variability > From Gradient) you can make many different versions of the pattern. You can use any brush type you are comfortable with. Using patterns as... well, patterns You can capture anything as a pattern in the Pattern Panel. Patterns can be used with the Fill Bucket , Pattern Pens , and as Clone Source , making them quite versatile. Capture patterns intended for lace and such as masked patterns to preserve transparency. Painter handles making seamless tiles nicely under check out pattern . Advantages: the Fill Bucket's great for fabric patterns or buildings....

Keep an eye out

Image
Bonus information for Tiny Tip #20 Download (ranarh.deviantart.com) My twentieth tutorial from the "Ranarh's tiny tips" series. You can find the other tutorials at my deviant Art account . - The lens sticks out of the eyeball. That's why it so often catches highlights - they do not necessarily appear inside the pupil. When painting mirrored reflections, keep in mind only lit parts are reflected. Reflections can make the pupil appear less than round from afar. - The eyeball is reddish at the inner corner. Some phenotypes have a yellowish eyeball, especially very dark black skinned people. - Eyelashes with heavy black makeup are easier to paint, but I urge you to learn to paint them without first. Lashes are about as long as the eyeball in profile - often men's are longer - and stick out in irregular rows. Don't zoom in too much, that minimizes the risk of too short lashes. Under harsh light, lashes cast a long shadow, especially at the outer corner. ...